How to setup a task to synchronise with a shared network folder /NAS as Windows Service?
This tutorial demonstrates how to setup a task to synchronise with a shared network folder (or NAS folder), and run the task as a Windows Service without user logon.
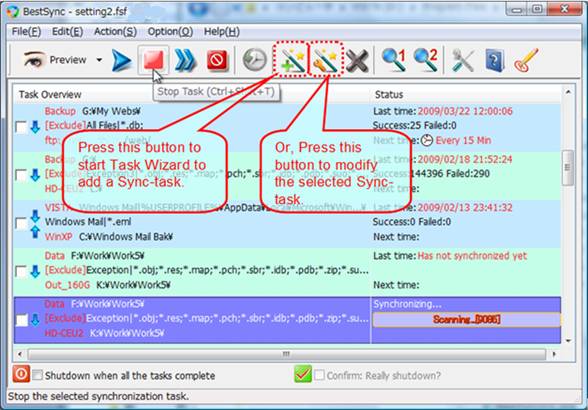
1. On the main windows, press
the “Add task” button (![]() ) to add a task.
) to add a task.
After you add a task, you
can modify it later by press the “Setup task” button (![]() ).
).
The task wizard starts up.
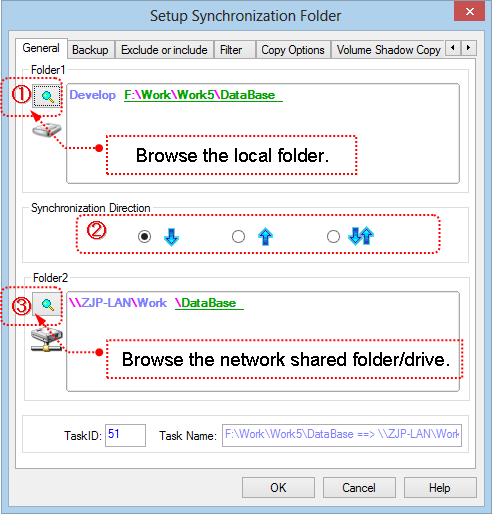
2. On the “General” wizard page, set the local folder, sync direction and the remote folder like the following graph.
3. Browse the network shared folder.
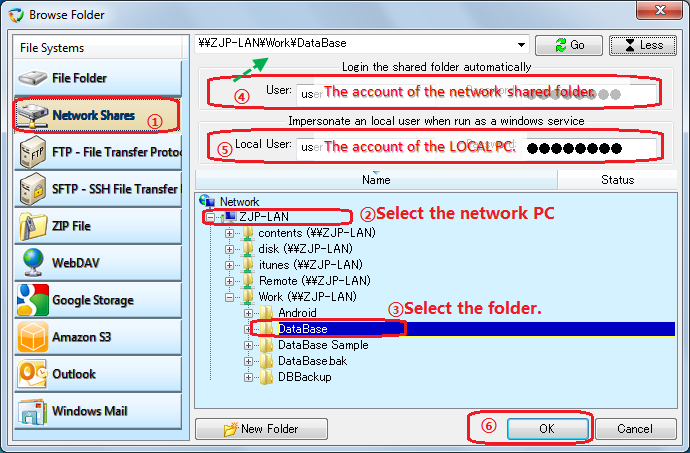
(1). Select "Network Shares" in the "File System" list.
The treeview searches the network PCs and the shared folders.
(2). Select the network PC in the tree view.
(3). Select the shared folder of sub-folder in the network PC.
If the network drive is not shown in the treeview, please input the network resource name directly into the combo-box, and click the "Go" button to refresh the tree view. The format of the shared folder likes the following:
\\NetHost\SharedFolder\Folder\
" NetHost": the network name or IP address of the network computer.
" SharedFolder" the name of the shared folder.If the network folder is still no displayed in the treeview after press "Go" button. May be you can ignore this error, just click OK to end the browser to use the input folder.
(4). If you need BestSync log on the network folder automatically, please input the name and password.
(5). If you need the taskrun as Windows Service(set the option later in the"Schedule" setting page), please input the user and password in the local PC. BestSync need this local account to acquire the provilege form the system to access the network resource.
(6). Click "OK" button to end the dialog box
4. Backup all the changed files to a backup folder if you need.
During synchronisation, the updated files are copied to the target folder, and the deleted files are also deleted from the target folder (according to the deletion options in the “delete” wizard page that will be setup later). You can backup these CHANGED files (overwritten files and deleted files) to the backup folder, like the following graph.
And you can save the versions of the CHANGED FILES into sub-folders that is created automatically by the “Versioning—Create sub-folder by the synchronising time”.
If you want to clean the old versions of the backup file automatically, type a day number for preserving the old files. The backup files that are older than the designated days will be cleaned automatically. If you do not want to clean the old files, type 0.
Press the “Next” button to go to the next page.
5. Exclude or include some folders or files into the synchronisation task.
If no folders or files are needed to be excluded from the synchronisation, just click “Next” button.
6. Select file types that are needed to be synchronised.
Check “Include subfolders” to backup file in all the sub-folders.
If your country uses Daylight Savings Time, and one of the two folders is FAT or FAT32 file system, please select the “Ignore file date & time changes that are because of Daylight Savings Time (DST) changes” option, otherwise, when the DST changes, all the files may copied again.
Press the “Next” button to go to the next page.
7. Select the necessary copy options.
The following graph is the recommended copy options.
“Use intermediate file during copy. (To prevent the file from being crashed.)” option:
If this option is checked, BestSync will use an intermediate file as the target file during copying process. When the file is copied successfully, the intermediate file is renamed to the target file. This action avoids an incomplete file in the target folder, and the target file is never cashed even if it fails to copy the file due to any error (such as network error).
“Process multiple files simultaneously.” Option:
This option will improve the performance dramatically when synchronise with network folder.
“Retry synchronisation if there are failed files.” Option:
If this option is checked, BestSync will retry the synchronisation if there are failed items.
“Resume failed file from the breakpoint.” Option:
If this option is checked, BestSync will resume the file copy operation from the last breakpoint if error happens during synchronisation. This option is very useful to copy a large file to/from FTP server or network drive.
8. The “Volume Shadow Copy” options are optional.
If the task needs to copy the opened/locked files, “Use "Volume Shadow Copy Service" to copy opened files……” option is necessary.
If this option is checked, the opened files such as windows registry file, data base file, Outlook .PST files can also be copied.Some files such as the SQL database file, and Outlook PST file are always locked, if you do not use this option, copying these files will fail.
If your OS is 64 Bit Windows, please download and install the x64 Bit version of BestSync for using this option.
On Windows VISTA/7/8 please run BestSync by the administrator privilege when this option is checked.
Press the “Next” button to go to the next page.
9. The “Encryption” options are optional.
If you want to compress and encrypt the files while synchronise the files, select the options like following graph.
When the encryption option is selected, BestSync compress the file first then used AES 256bit algorithm to encrypt the file.
Press the “Next” button to go to the next page.
10.The “Rename” options are optional.
If need to rename the files when synchronise the files, add the rules to rename the files.
If not need to rename the files, just click the “Next” button.
Press the “Next” button to go to the next page.
11. Select the “Delete” options as you prefer.
The typical option is “Delete: Delete the remained file in the other side”.
(1) “Do nothing”. If you want to use a backup profile, than deleted files from the source will still be preserved in the Target Folder.
(2) Or, “Delete: Delete remained file in the other side”. If the files are deleted from the source, then it will also be deleted from the target folder.
(3) Or, “Mirror: Delete file in ….”. To make the contents of both folders exactly the same. All the files that do not exist in the source folder will be deleted from the target folder.If the files in the source folder are old, the old files will overwrite the new files in the target folder.
(4) Leave "Do nothing" selected, in “Delete file for save space”.
Press the “Next” button to go to the next page.
12. Designate a schedule to start the task automatically.
Select "Designate a schedule", and select a time mode to start the schedule.
Check "Service Sync: Run task as Windows Service (need not user login)" option, this task will be ran by BestSync Service. Even no user is logging in, or the user logs off, this task is still run by the designated schedule.
If you want the changed files be backed up or synchronised immediately after the files are changed, select the "Real-Time Sync: Synchronise files immediately after they are changed". If this option is selected, the task will be started immediately after BestSync is started; and whenever files or folders are changed, the task detects the changes immediately and update the changes to the another side.
Press the “Next” button to go to the next page.
13. Press the “Next” button, to use the default log setting.
Check the “Record the log data for the log view window” option. This option will record the log data of the synchronisation. You can view the log data by the Log View, and if you have setup the “Backup” option in “step 4”, you can also restore the backup data conveniently in the Log View.
If you want to send the log data by the email to monitor the synchronisation remotely, check the “Send log data by e-mail” option. After this option is checked, the “General Option” “Email” dialog box will popup, you can setup the SMTP account in the dialog box.
Press the “Next” button to go to the next page.
14. The “Application” options are optional.
If you want a program or batch file be started just before the synchronisation is started, set the program and argument like step (1) in the above graph.
You can also designate the Task be ran after this task like step (2) in the above graph.
Press "Finish" for the “Application” Wizard Page.
15.Press the “Preview” button to start the preview window, to view the hit files and modify the sync actions of sub-folders of individual files if necessary.
Or just press the “Start” button to synchronise the files immediately.
BestSync Main Window:
BestSync PreView Window:
(End)